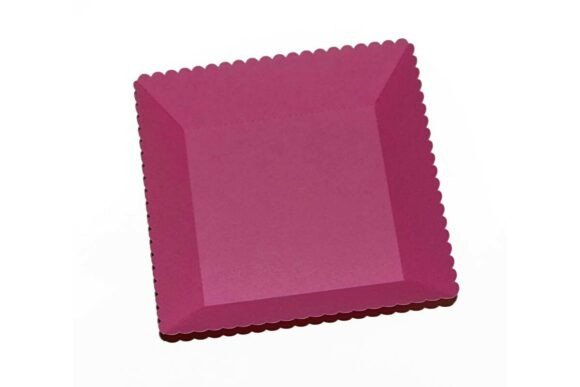
The Art of Assembly: Mastering the 3D Rectangle Scalloped Decor Paper Tray
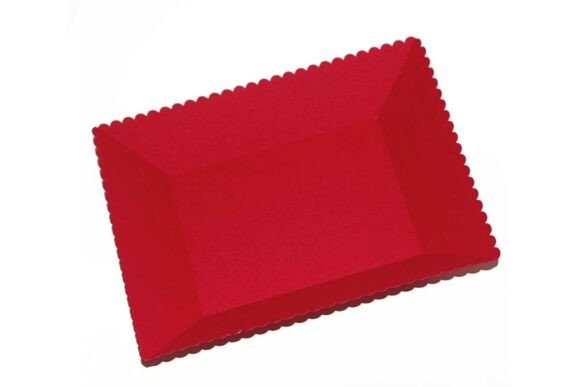
In the world of paper crafts, few items bridge the gap between simple utility and sophisticated design quite like a 3D rectangle scalloped decor paper tray. These elegant containers are more than just vessels for holding small items; they are testaments to the precision of digital cutting and the timeless appeal of handmade aesthetics. Whether you are planning a wedding, organizing a craft business, or simply looking for a creative weekend project, understanding how to construct these trays can elevate your crafting game from basic folding to professional-grade finishing.
This guide will walk you through everything you need to know about this specific design, from the technical specifications of the SVG file to the tactile satisfaction of assembling a sturdy, beautiful container. We will explore why this particular shape works so well, how to choose the right materials, and the subtle techniques that ensure your final product looks as good as it functions.
Understanding the Design: What Makes It Special?
At first glance, a paper tray might seem like a straightforward object. However, the "scalloped" edge adds a layer of complexity and charm that transforms a plain box into a decorative piece. The scalloped border provides a soft, rhythmic visual texture that contrasts beautifully with the sharp, clean lines of the rectangular base. This combination of curves and angles is what makes the design visually appealing across various settings, from rustic bohemian weddings to modern minimalist office organizers.
The core innovation of this specific design lies in its construction method. Unlike traditional boxes that require complex interlocking flaps or multiple pieces of paper glued together, this tray design comes as one piece cut. This single-piece architecture simplifies the assembly process significantly. It reduces the risk of misalignment errors during gluing and ensures that the structural integrity of the tray is uniform throughout. For beginners, this means fewer points of failure; for experienced crafters, it means faster production times without sacrificing quality.
The Role of Digital Cutting Files
To achieve such precision, modern crafters rely on digital tools. The cutting file for this tray comes in SVG format (Scalable Vector Graphics). Why is this important? SVG files are resolution-independent, meaning they can be scaled up or down without losing any detail or clarity. When you send an SVG file to a cutting machine—such as a Cricut, Silhouette, or other vinyl cutters—the machine reads the vector paths with mathematical precision.
This ensures that every fold line, score mark, and cut edge is identical, regardless of how many trays you produce. If you were to print a raster image (like a JPEG) and try to cut it by hand, inconsistencies in printing would lead to uneven folds and weak corners. With an SVG file, you guarantee consistency batch after batch. This is particularly relevant for those using these trays for business purposes, where brand consistency and professional presentation are paramount.
Step-by-Step Assembly Guide
While the digital aspect handles the creation of the template, the physical assembly is where the magic happens. The process is designed to be intuitive, but paying attention to detail is key to a durable result. Here is how to bring your 3D rectangle scalloped decor paper tray to life.
1. Preparation and Material Selection
Before you even begin cutting, selecting the right paper is crucial. As noted in the design specifications, using heavy weight card stock is recommended for this project. But why? Lighter papers, such as standard printer paper or thin scrapbook paper, may hold their shape initially but will quickly lose rigidity when filled with items. Heavyweight cardstock (typically measured in points or GSM) provides the necessary stiffness to support weight without bending or collapsing.
- Weight Recommendation: Look for cardstock between 80lb and 110lb text weight, or approximately 200–300 GSM. This range offers a perfect balance of flexibility for folding and stiffness for structure.
- Texture Considerations: Smooth finishes allow for cleaner glue bonds, while textured papers can add aesthetic depth but may require slightly more adhesive coverage.
2. Cutting and Scoring
Once your SVG file is loaded into your cutting software and sent to your machine, proceed with the cut. Most designs include both cut lines (which go all the way through the material) and score lines (which create indentations to facilitate folding).
If your machine does not have a scoring tool, you can use a bone folder or a blank ballpoint pen to gently trace over the score lines before cutting. This pre-scoring step is vital because it compresses the fibers of the cardstock along the fold lines, ensuring crisp, sharp creases rather than jagged tears.
3. Folding Along Perforated Lines
After cutting, remove the excess paper around the main shape. You should now have a flat, intricate outline with a scalloped top edge. The next step is to fold along the perforated lines. Note that while some designs come with actual perforations (tiny holes that weaken the paper for easy tearing), most digital SVGs rely on score lines for folding. Be sure to distinguish between cut lines (which separate parts) and score lines (which define the 3D shape).
Fold each side inward at a 90-degree angle. Use a ruler or a bone folder to press down firmly on the creases. A sharp fold is essential for the next step, as it creates a flat surface for the adhesive to bond effectively.
4. Gluing the Corners Tabs
The final structural step involves securing the sides. This tray design features corner tabs that extend beyond the main body. Your instruction is to glue the corners tabs to the back. This internal reinforcement technique is clever because it hides the glue joints from the exterior view, maintaining the clean, decorative look of the scalloped edge.
- Apply a thin, even layer of strong craft glue or double-sided tape to the inside of one corner tab.
- Fold the adjacent side panel over and press the tab against the inner wall of that panel.
- Repeat for all four corners.
- Allow sufficient drying time. Rushing this step can cause the tray to pop open under the weight of its contents.
Practical Applications and Modern Relevance
Why invest time in making these trays? Their versatility is unmatched. In today’s market, there is a growing demand for personalized, eco-friendly packaging solutions. Mass-produced plastic containers feel impersonal, whereas handmade paper trays offer a tactile, warm connection to the recipient.
Events and Celebrations
One of the most popular uses for 3D rectangle scalloped decor paper trays is in event planning. They serve as stunning centerpieces for dessert tables, holding macarons, chocolates, or candies. The scalloped edge mimics the lace doilies often used in vintage tea parties, adding a touch of nostalgia. Additionally, they make excellent favor boxes for guests to take home, reducing waste compared to disposable plastic bags.
Business and Branding
For small business owners, especially those selling jewelry, cosmetics, or artisanal goods, custom packaging is a powerful marketing tool. By printing your logo or branding colors onto the heavyweight cardstock before cutting, you turn a simple tray into a branded experience. The one-piece design allows for efficient bulk production, making it cost-effective for entrepreneurs who want to maintain high-quality standards.
Home Organization
Beyond gifting, these trays are fantastic for daily organization. Place them on a desk to hold paperclips, stamps, or coins. Use them in a bathroom to store cotton balls and swabs. The rigid structure keeps items contained and visible, reducing clutter. Because they are made of paper, they are lightweight and easy to move or rearrange as your organizational needs change.
Common Misconceptions and Tips for Success
Even with a straightforward design, crafters sometimes encounter issues. Let’s address a few common misunderstandings.
Misconception: "Any paper will work."
As mentioned earlier, using light paper is the most common error. A tray made from thin paper will sag and lose its shape quickly. Always stick to the recommended heavyweight cardstock for durability.
Misconception: "Glue everywhere is better."
Applying too much glue can warp the paper, especially if it absorbs moisture. Use a minimal amount of adhesive on the tabs. If using liquid glue, consider using a toothpick to apply it precisely to avoid smudging on the visible scalloped edges.
Tip: Embellish Strategically
While the tray is beautiful on its own, you can enhance it further. Add ribbon around the base, attach a small tag with a gift message, or use metallic markers to highlight the scalloped peaks. However, remember that the strength of this design lies in its simplicity. Over-decorating can distract from the elegant geometry of the form.
Conclusion
The 3D rectangle scalloped decor paper tray is a perfect example of how digital technology and traditional craftsmanship can coexist harmoniously. By leveraging the precision of SVG files and the tactile quality of heavyweight cardstock, you can create functional art that serves both practical and aesthetic purposes. Whether you are crafting for fun, for profit, or for a special occasion, mastering this one-piece design opens up a world of creative possibilities. So, gather your materials, fire up your cutter, and start folding—you’ll be amazed at how quickly a flat sheet of paper transforms into a stunning, three-dimensional masterpiece.