3d Layered Baby Rainbow Shadow Box Frame
In the realm of digital crafting and personalized nursery decor, precision is paramount. The 3d Layered Baby Rainbow Shadow Box Frame represents a sophisticated intersection of design complexity and sentimental value. For creators, small business owners, and hobbyists alike, this asset is not merely a static image but a structural blueprint for creating dimensional art. It transforms a simple photograph into a multi-layered narrative, utilizing depth to evoke emotion. Understanding how to integrate this 9-layer SVG file into your production workflow requires more than just loading it into cutting software; it demands an appreciation for material properties, assembly logic, and quality control protocols.
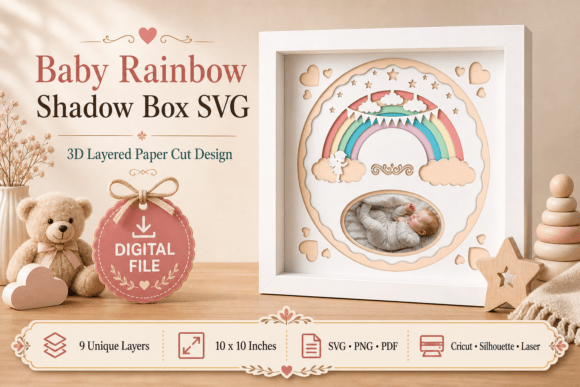
Understanding the Asset Structure
Before execution begins, one must analyze the anatomy of the design. This specific shadow box is engineered with nine distinct layers, each contributing to the final aesthetic and structural integrity. The design typically includes a pastel rainbow arch, fluffy cloud formations, a central angel motif, and whimsical accents like stars and hearts. Crucially, there is a central oval cutout designed to hold a baby’s photograph. This structure dictates the workflow: you are not cutting a single piece of cardstock, but rather managing a stack of interrelated components that must align perfectly.
The file formats provided—primarily SVG and PNG—are optimized for different stages of the process. The SVG file serves as the primary vector source, ensuring clean lines and precise coordinates for blade or laser paths. It is compatible with major platforms such as Cricut Design Space and Silhouette Designer Edition. The high-resolution PNG acts as a visual reference or backing layer, useful for testing print quality or serving as a guide during manual assembly if digital cutting tools are unavailable. Recognizing the distinction between these files prevents errors in the initial setup phase.
Integration into Production Workflows
For professionals running small home-based businesses or Etsy shops, consistency is key to customer satisfaction. Integrating the 3d Layered Baby Rainbow Shadow Box Frame into a repeatable production line involves several critical steps. First, consider the material selection. Cardstock weight significantly impacts the outcome. Thinner papers may lack the rigidity needed to support the height of the shadow box, leading to sagging or misalignment. Conversely, overly thick paper can make it difficult to fit all nine layers into standard frame depths or cause the layers to bow outward.
A recommended approach is to test materials before bulk production. Create a prototype using a mixed-media sample pack. Evaluate how different colors interact when layered. The pastel rainbow theme relies on soft transitions; therefore, selecting complementary shades of pink, blue, yellow, and green is essential for maintaining the "dreamy" aesthetic described in the product details. This pre-production planning reduces waste and ensures that the final product meets the high standards expected by parents seeking premium keepsakes.
Software Preparation and Optimization
Once the material is selected, the next step is software optimization. When importing the SVG into your cutting software, inspect the layer order. Most shadow box designs require layers to be arranged from back to front to ensure proper alignment during assembly. If the software automatically reorders the layers, manually adjust them to match the intended depth sequence. Additionally, check for "welding" or "union" operations. Complex elements like the angel or cloud clusters may need to be welded together to prevent the cutting blade from lifting unnecessarily, which can result in jagged edges or torn paper.
Efficiency in this stage also involves setting up your cutting mat layout strategically. Since the design spans multiple sheets or a large area depending on the final size, grouping similar-colored layers allows for fewer mat changes. This logistical consideration saves time and reduces the risk of misalignment that occurs when reloading mats. For laser cutting users, ensure that the vector paths are set to "cut" and any internal decorative holes are set to appropriate power settings to avoid burning delicate features.
Assembly and Quality Control
The assembly phase is where the digital design becomes a tangible object. This process requires patience and a systematic approach. Begin by sorting the cut layers according to their position in the stack. Labeling each layer with a number or letter corresponding to its depth can prevent confusion, especially when working with similar-colored pastels. The use of double-sided foam tape is standard practice for shadow boxes, as it creates the necessary separation between layers to achieve the 3D effect. However, the thickness of the foam must be consistent across all layers to maintain a flat, professional finish.
Quality control checks should be performed at each stage of assembly. Verify that the central oval cutout is centered correctly relative to the outer frame boundaries. Misalignment here will detract from the overall symmetry. Furthermore, inspect the intricate details, such as the tiny stars and heart accents, to ensure they have fully released from the parent sheet. Any remaining bridges or uncut sections must be carefully removed with a precision knife to preserve the delicate nature of the papercut art.
Photography Integration
The focal point of this frame is the baby’s photograph. The workflow must account for the photo preparation. The image should be printed on high-quality photo paper that matches the tone of the surrounding layers. A glossy finish might reflect light too harshly under nursery lighting, whereas a matte or satin finish often blends better with the soft, pastel aesthetic of the rainbow and clouds. Ensure the photo dimensions match the oval cutout precisely. If the photo is too large, it will create unwanted shadows behind the frame edge; if too small, it will leave unsightly gaps.
Long-Term Value and Market Positioning
From a business perspective, offering a 3d Layered Baby Rainbow Shadow Box Frame positions your brand within the premium segment of nursery decor. Customers are not just buying a frame; they are purchasing a crafted experience. The complexity of the 9-layer design signals effort and care, which justifies a higher price point compared to mass-produced alternatives. To maximize this value, consider bundling the digital download with physical materials or offering customization services, such as adding the baby’s name or birth date to the angel motif.
Furthermore, this asset supports sustainable practices by allowing customers to create items on demand rather than stocking inventory. For digital sellers, providing clear instructions alongside the download enhances user experience. Include a guide on recommended paper weights, adhesive types, and assembly tips. This proactive support reduces customer frustration and negative reviews, fostering trust and encouraging repeat business.
Conclusion on Implementation
Successfully leveraging the 3d Layered Baby Rainbow Shadow Box Frame requires a blend of technical skill and artistic sensibility. By treating the SVG file as a complex engineering blueprint rather than a simple graphic, creators can produce high-quality, emotionally resonant products. Attention to detail in material selection, software optimization, and assembly procedures ensures that the final output reflects the enchanting vision of the original design. Whether used for personal keepsakes or commercial ventures, this structured approach to implementation guarantees a professional result that honors the precious moments it is designed to capture.